To create your first GitLab repositories follow step-by-step instructions:
1. Go to https://git.cs.du.edu and login with your LDAP (this is your CS Unix account) username and password.
2. Go to your “Profile Settings” in upper right corner of a Dashboard and click on “SSH Keys” and “Add an SSH key”.
3. To create an actual key go to your local Linux, Unix, or Mac machine where you plan to keep your local repository, cd to your local $username/.ssh directory and execute the following command:
ssh-keygen -t rsa -C “$username@cs.du.edu”
leave file name and passphrase empty.
4. Copy all content of the id_rsa.pub file as ‘cat id_rsa.pub’ and paste it to the Key window on GitLab server. Give this key a title and click “Add key”.
5. To create a new project click on a “+” sign in the dashboard menu.
6. Give project a name (use a class number, quarter, a year and your username as ‘COMP2372-F2013-yourusername’), short description and make sure “Internal” radio button is unchecked.
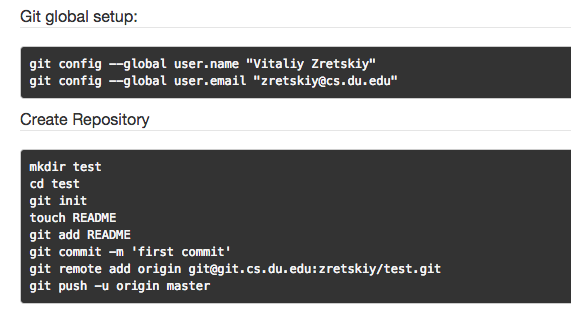
7. Right after a repository is created you will see a page with Git commands listed for global setup and repository creation. These commands should be executed on a local machine, the same one your SSH key was created.
What if after I did ‘git push -u origin master’ I am asked for a password and then got a ‘Permission denied’ message?
8. You should receive an email confirmation from the server.
Now you have a synchronized copy of COMP2372-F2013-yourusername on both the local Linux system and the remote Gitlab server.
Share this project with the instructor by specifying the instructor (jedgingt@cs.du.edu) as one of your members. To add the instructor (or others in your team project) as your team member, click the “Settings” on the upper menu and click on a green button “New project member”. Choose people and add your instructor name. Set an access for the instructor as “Master” and click on “Add users” button. Your instructor will receive an email informing him/her that the access is granted.
How to Add Directories and Files to a Gitlab Project
Now when you’ve created a server repository and your local one, you can add more files and directories to your local repository, synchronize them with the server repository and share them with your team members or with your instructor.
What you do is:
1. Go to your Git repository you’ve created on your local Linux machine and create a file or directory: cd COMP2372-F2013-username. mkdir test
2. Add your new directory to the local repository:
git add test
3. Commit changes to the local repository:
git commit -m "massage"
4. Push the local copy of your repository to the server:
git push
5. Whenever you start working on your local repository use ‘git pull’ to synchronize your local repository with changes have been made by your project members.
6. To “import” a repository from the server to different location you can use:
git clone git@git.cs.du.edu:username/comp2372-f2013-username.git
You can see more git commands by using ‘git –help’ on your local machine.
Back to git.cs.du.edu

